Fun with Lasers!

Just about the only thing I don’t love about the Open ReVolt motor controller is the case.

As cool as an Open Source Motor Controller is, it’s just not shown off with a basic metal cover. In fact, I actually drilled through the original cover (and put clear packaging tape over the holes!) to see the power and troubleshooting LEDs through the lid.

Recently, the Milwaukee Makerspace got itself a laser cutter. It’s not all that powerful, but more than capable for cutting plastics. One of the Makers posted a blog entry about making a wood box on the laser. He used a program called BOXMAKER which helps you layout the size of your box, including overlapping cut edges to put the whole thing together.

This got me started on the idea of building a clear plastic case for my 500 amp Open ReVolt controller. But I had never even used the laser before. I sat down with the member who owns the laser, and he took me through the basics of importing files, exporting to the laser, and modifying power and speed settings. With that, I was able to start making a few test items on the laser. I figured that since I already had the Open ReVolt logo as a vector file, it couldn’t be easier to try out etching some plastic with it.

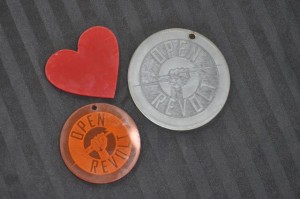
I used the laser to make a few small test pieces on various materials. The two logos turned out pretty well. They were both etched AND cut out with the laser. On the orange medallion, I mirrored the image, so it would be a design on the “back” of the piece. That keeps the upside nice and shiny and clean.

Plastics cut on the laser


After practicing a bit on the laser, I started wondering what else I could cut, mark, or etch with the laser. Last night, I forgot something at the Makerspace, so I had to return there this morning to retrieve it. And I am NOT a morning person, so I had my trusty travel coffee mug with me. It’s stainless steel with an anodized dark gun metal finish to it. “I bet that would laser engrave nice!” I though to myself. Sure enough, it only took a little tinkering to figure out how to keep the mug from rolling sideways inside the laser before I could engrave it.

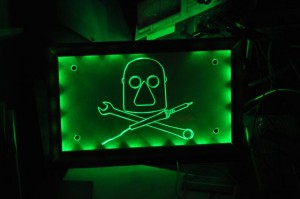
Also, when I came in this morning, all the lights were off, except for one – Tom’s LED lit plexiglass desk drawer. I asked him for some advice last night about how to engrave and then edge-light in clear plastic. He plugged in his project to show me a sample, and had left it on. It was eerily awesome to see the Makerspace lab lit up by green LED power! It’s a good example of how I would like to engrave the top of the controller case and light it up.

Well, that’s it for now. Next, I’ll have to take careful measurements of the controller, lay out the box, find some material to work with, and figure out where and how big the cuts in the end plates will need to be for the bus bars.

Unexpected Detour

When I arrived at the space Sunday, I had planned to work on a circuit board design in DipTrace.  After I left, I had spent six hours rewiring a golf cart.  Allow me to explain…

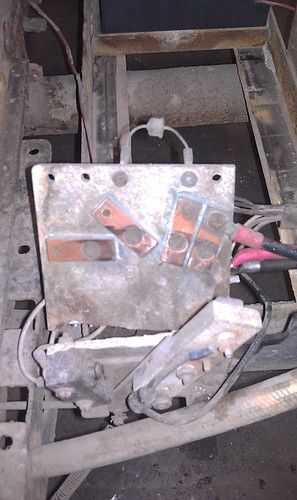
It all started when I went to take the trash out.  I used the golf cart with the flatbed to ferry the cans out to the dumpster.  After emptying the cans, I rode back and decided to charge the cart’s batteries.  Tom and Rich had just returned from lunch and Tom suggested we swap out batteries instead.  While swapping them out, we decided to also rewire them.  While rewiring them, part of the cart broke.  There’s a small white plate under the driver’s seat.  It’s about 4″ x 6″, likely made of asbestos, and holds a series of copper contacts that a lever attached to the gas pedal slides over to select the speed of the cart.  And it broke in two when we tried to tighten fix a wire on it.

We had a few options: try to mend the old, brittle plate, replace it with something new, rewire the whole thing, or scrap everything out for a solid state motor controller.  Not wanting to adopt a new project or sacrifice a motor controller that could be better used elsewhere, I volunteered to try and fabricate a replacement for the broken part.

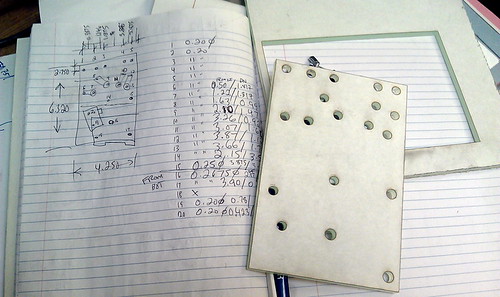
First I documented everything just the way it was.  I labeled wires, took photos, scribbled down notes, etc.  Next I went about removing the broken plate.  There was probably more rust than metal on those bolts.  Then I took a pair of digital calipers and a ruler and measured the locations and sizes of holes for each component.  I considered using the CNC router or drilling a plate by hand, but the laser cutter seemed to be a much faster and precise approach.  I drew up my replacement plate in CorelDraw and found a scrap of 1/4″ acrylic that matched the size and thickness of the old plate.  After some tinkering with the printer driver and a dozen passes with the laser, I had a copy of the original in plastic form.

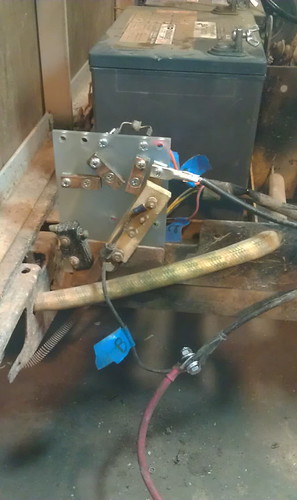
The next few hours were spent migrating the old parts over to the new one and wiring it back in.  Right around 7:00 PM, I tied some batteries together and the thing leaped forward.  A few more tests and it should be as good as new.  Someone suggested that maybe the plate was asbestos to avoid heating issues so we’ll keep an eye on that too.

Rotary Encoder – built into motor for Electric Car

My electric Dodge neon uses an AC motor and an industrial motor controller.  I upgraded from m 1984 motor controller to one less than 25 years old (actually less than 5.)

The new controller does much more than the old one and has the ability to do some fancy tricks.  At the moment I am running it in “sense vector” mode.  The controller senses the position of the armature by monitoring the current in the field coils.  This works great…   as long as the motor is spinning.  From a stop it tends to get out of sync, but there is a cure!

The controller can use a quaderature encoder so the encoder can read the position of the armature at any speed.

To add an encoder to the motor I decided to try a chip amde by Austrial Microsystem AS5040.  This chip senses a magnet near the chip and calculates the position of the magnet and can generate multiple output:  PWM, binary via I2C, and quadurature!
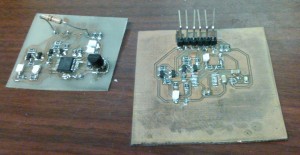
I bought a few of the chips and built a surface mount board to hold the chip and a few LEDs to display the output.  The first two version had a few problems but the 3rd time was the charm.


Thanks to Royce for working out the process for surface mount PCBs.


The final version had to be small enough to fit in a depression in the end of the motor cap.  The sensor centered and the whole board insulated (clear enamel)  since this is a grease pocket
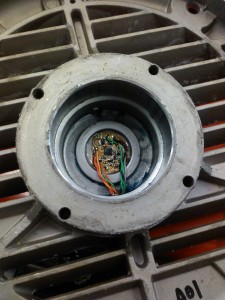
for the rear motor bearing.
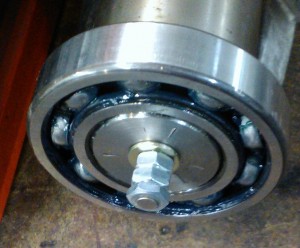


The magnet is mounted to a bolt that is threaded into a tapped hole in the back end of the armature.  It took a while to the position right (it needs to be within a few millimeters of the sensor) hence the nuts and washers.
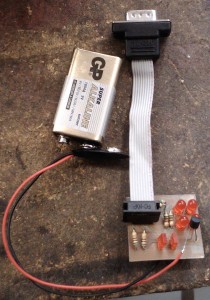
 

The cable is brought out of the motor through a small threaded hole (it was an alternate location for the grease fitting.)  The hole is filled with epoxy and the wires go to a DB9 connector.   I built a small test board that shows the quadurature signals (4 round LEDs) and the status outputs from the chip (the two rectangular LEDs)
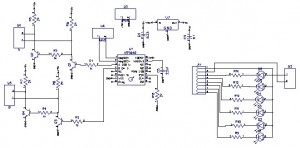


The motor controller puts out 15V to power an encoder and wants A and B as well as inverted A and B signals.  The circuit includes some NPN transistors along with a voltage regulator and a few capacitors to tie it all together.  I put the schematic for both the sensor and test board on one schematic so I could make both boards at the same time.

I installed it in the car today, but still need to put a few more parts together to run it.


DOH!

It doesn’t work!

Ok, so the electronics work fine, it talks to the controller.

But it tops out at 256 pulses per revolution and the controller needs 1024.  It was a minor confusion between terminology.  The sensor detects 1024 positions, but to generate quaderature it uses 4 positions per pulse output.

Back to the drawing board.


I picked up a commercial shaft encoder on ebay for 50 that outputs 1024 PPR but it only works at 5V, so I’ll need a level shifter board and connector adapter.

Oh, yea, and I need to put the motor again, take out the old encoder, bring a shaft extension through the back grease pocket, add a grease seal and couple it to the encoder.



Thursday Night Time Lapse

A time lapse video complied from the Milwaukee Makerspace CCTV system. 7 hours of video compressed into 4 minutes. All events took place between 4:30 and 11:30 PM Thursday, September 29, 2011.

Activities include:
– Rich welding
– Chris and Rich working on their electric cars
– Chris driving his electric car in and out of the shop
– Tom, Adam, and Royce working in Diptrace
– Bret, Rich, Royce, and Adam blacksmithing items with the forge
– Various people working on misc. projects and chatting
– Royce, Brant, and Adam etching and tin-plating circuit boards
– Pete working on his Makerbot 3D printer